

Manual Transaxle Oil⁚ A Comprehensive Guide
This guide provides a comprehensive overview of manual transaxle oil‚ covering its function‚ the importance of regular changes‚ recommended intervals‚ and various oil types. We’ll also detail the oil change process‚ troubleshooting‚ and maintenance tips for optimal transaxle performance and longevity. Understanding these aspects ensures smooth shifting and extends the life of your vehicle’s transmission.
Understanding Manual Transaxle Oil
Manual transaxle oil‚ also known as gear oil or transmission fluid‚ is a specialized lubricant designed for manual transmissions. Unlike engine oil‚ it’s formulated to withstand higher pressures and shear forces experienced within the gearbox. Its primary function is to lubricate the moving parts‚ reducing friction and wear between gears‚ bearings‚ and synchronizers. This lubrication ensures smooth gear shifting‚ prevents premature wear‚ and promotes the overall longevity of the transaxle. The viscosity of manual transaxle oil is crucial; it must be suitable for the operating temperatures within the transmission. Incorrect viscosity can lead to poor shifting‚ increased wear‚ and potential damage. Choosing the right oil type‚ specified by your vehicle’s manufacturer‚ is essential for maintaining optimal performance and extending the life of your manual transaxle.
Importance of Regular Oil Changes
Regular manual transaxle oil changes are crucial for maintaining optimal transmission performance and extending its lifespan. Over time‚ the oil degrades due to heat‚ friction‚ and contamination from metal particles generated during gear operation. This degradation leads to a decrease in lubrication effectiveness‚ resulting in increased wear and tear on internal components. Contaminants‚ such as metal shavings and debris‚ can accumulate‚ hindering smooth gear shifting and potentially causing damage. Neglecting oil changes increases the risk of premature transmission failure‚ leading to costly repairs or even complete replacement. Regular oil changes ensure the continued smooth operation of the transmission‚ preventing premature wear and maintaining its efficiency. A fresh supply of clean oil provides optimal lubrication‚ reducing friction and extending the life of the vital components within the transaxle.
Recommended Oil Change Intervals
Determining the ideal manual transaxle oil change interval depends on several factors‚ including driving conditions‚ vehicle usage‚ and manufacturer recommendations. While some sources suggest intervals between 30‚000 and 60‚000 miles (48‚000 to 96‚000 km)‚ it’s crucial to consult your vehicle’s owner’s manual for the most accurate guidance. Severe driving conditions‚ such as frequent towing or off-road use‚ necessitate more frequent changes. Similarly‚ vehicles subjected to high-performance driving or extreme temperatures may require more frequent oil changes to compensate for increased wear and tear. Regularly checking the oil’s condition is also advisable. If the oil appears dark‚ dirty‚ or smells burnt‚ it’s a clear indication that a change is needed‚ regardless of mileage. Ignoring manufacturer recommendations and signs of degraded oil can lead to premature transmission failure and expensive repairs.
Types of Manual Transaxle Oil
Manual transaxle oil is categorized by viscosity grades‚ typically denoted by a SAE (Society of Automotive Engineers) rating such as 75W-90‚ 80W-90‚ or others. The “W” signifies winter viscosity‚ indicating its performance in cold temperatures. The number following the “W” represents the viscosity at lower temperatures‚ while the second number indicates viscosity at higher operating temperatures. A higher number denotes thicker oil. The choice of oil depends largely on the vehicle’s manufacturer specifications‚ operating climate‚ and driving style. Using the incorrect oil viscosity can negatively affect shifting performance‚ leading to rough engagement‚ increased wear on components‚ and potential transmission damage. Synthetic oils generally offer superior performance compared to conventional oils‚ providing better protection against wear and tear‚ especially under extreme conditions. Always refer to your vehicle’s owner’s manual to identify the recommended oil type and viscosity for optimal transaxle performance and longevity.

The Manual Transaxle Oil Change Process
This section details the step-by-step procedure for changing your manual transaxle oil‚ including necessary tools‚ drain and fill plug access‚ draining old oil‚ refilling with new oil‚ and verifying the correct oil level. Following these steps ensures a successful and safe oil change.
Step 1⁚ Gathering Necessary Tools and Materials
Before commencing the manual transaxle oil change‚ gather all necessary tools and materials. This ensures a smooth and efficient process. You’ll need a new quantity of the correct type of manual transmission fluid‚ specified by your vehicle’s manufacturer. Consult your owner’s manual for the exact type and amount. Next‚ acquire a drain pan to collect the old oil; a properly sized wrench or socket to remove the drain and fill plugs is essential; a funnel aids in cleanly refilling the transaxle; and jack stands or ramps for safely lifting the vehicle are crucial for access. Remember to use gloves to protect your hands from the used oil. Having clean rags or shop towels readily available is also helpful for cleaning up any spills. Finally‚ ensure you have a torque wrench to tighten the drain and fill plugs to the manufacturer’s specified torque setting to prevent leaks. Proper preparation minimizes complications during the oil change.
Step 2⁚ Accessing the Transaxle Drain and Fill Plugs
With the vehicle securely raised on jack stands or ramps‚ locate the transaxle drain and fill plugs. Consult your vehicle’s repair manual or online resources for their exact locations; they often vary depending on the make and model. The drain plug is typically located at the lowest point of the transaxle housing‚ allowing for complete oil drainage. The fill plug is usually situated higher on the transaxle case. Before removing any plugs‚ clean the surrounding area to prevent debris from contaminating the new oil. Use a suitable wrench or socket to carefully loosen both plugs. Be cautious when loosening the drain plug‚ as the old oil will be hot and may spill. Have your drain pan positioned underneath to catch the used oil. Once both plugs are loosened‚ you can fully remove them to proceed with draining the old oil. Remember to work carefully and methodically to avoid any damage to the transaxle.
Step 3⁚ Draining the Old Oil
With the drain plug removed‚ allow the old transaxle oil to flow completely into your drain pan. This process may take some time‚ depending on the oil’s viscosity and temperature. The warmer the oil‚ the faster it will drain. Patience is key here; ensure all the old oil is drained before proceeding to the next step. While waiting for the oil to drain completely‚ you can use this opportunity to inspect the drained oil for any unusual debris‚ discoloration‚ or metallic particles. Such observations can indicate potential issues within the transaxle. Once the flow of oil has significantly slowed or stopped‚ you can reinstall the drain plug. Tighten the drain plug securely but avoid over-tightening‚ which could damage the threads. Use a torque wrench if possible to ensure the correct tightening torque‚ as specified in your vehicle’s repair manual. After tightening the drain plug‚ clean any spilled oil around the transaxle housing before moving on to refilling.
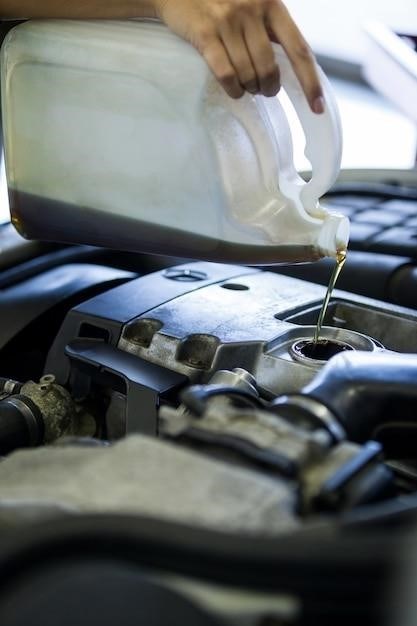
Step 4⁚ Refilling with New Oil
Locate the transaxle fill plug. This is often near the drain plug‚ but consult your vehicle’s service manual for the exact location. Once located‚ carefully remove the fill plug. Using a funnel‚ slowly pour the new transaxle oil into the fill hole. Refer to your vehicle’s manual for the correct amount of oil needed. Avoid overfilling‚ as this can damage the transaxle. Pour the oil slowly to prevent air bubbles from entering the system. It’s helpful to periodically pause and allow the oil to settle‚ then continue adding oil. If you don’t have a pump‚ you might find pouring the oil in stages more effective. Clean up any spills immediately to prevent environmental contamination. Once the correct amount of oil has been added‚ replace the fill plug‚ ensuring it is securely tightened. Again‚ avoid over-tightening. If using a torque wrench‚ refer to your vehicle’s service manual for the specified torque value.
Step 5⁚ Checking the Oil Level
After refilling‚ checking the oil level is crucial. Many manual transaxles lack a dipstick; therefore‚ relying on the fill plug’s position is essential. With the vehicle level‚ the fill plug should be slightly below the transaxle’s fill point. If oil seeps out when the plug is slightly loosened‚ the level is correct. If not‚ add more oil until it starts to seep. Remember to always refer to your vehicle’s service manual for the precise oil capacity and any specific level checking instructions. Some vehicles might require a specific procedure‚ such as warming up the transmission before checking. Overfilling can be detrimental‚ potentially causing seals to leak or internal components to be damaged. Underfilling‚ on the other hand‚ leads to insufficient lubrication and premature wear. Accurate oil level checking ensures optimal transaxle performance and longevity. After checking‚ ensure the fill plug is securely tightened to prevent leaks.
Troubleshooting and Maintenance Tips
This section addresses common manual transaxle issues‚ such as difficult shifting or noises‚ and provides maintenance advice for optimal performance. Regular oil changes and adherence to manufacturer recommendations are key to preventing problems and maximizing your transaxle’s lifespan.
Identifying Potential Problems
Identifying potential problems with your manual transaxle often involves recognizing unusual symptoms. Difficulty shifting gears‚ whether it’s a grinding noise‚ a stiff feel‚ or the inability to engage a gear altogether‚ could indicate low or contaminated oil. A whining or humming sound during operation‚ especially under load‚ might point to worn components lubricated by insufficient or degraded oil. Leaks around the transaxle housing are another clear sign of trouble; these can lead to significant oil loss and eventual damage. Unusual smells‚ such as burning oil‚ often signal overheating and potential internal component damage. Finally‚ vibrations or shuddering during gear changes‚ especially at specific speeds or under load‚ can suggest internal issues within the transaxle that are often worsened by inadequate lubrication. These issues highlight the importance of regular oil checks and changes‚ as early detection can prevent more extensive and costly repairs.
Maintaining Optimal Transaxle Performance
Maintaining optimal transaxle performance relies heavily on consistent preventative maintenance. Regular oil changes‚ adhering to the manufacturer’s recommended intervals‚ are paramount. Using the correct type and viscosity of oil is crucial; using the wrong oil can lead to premature wear and damage. Beyond oil changes‚ ensure the transaxle is properly lubricated. Check for leaks regularly‚ addressing any promptly to prevent significant oil loss. Avoid harsh driving habits like sudden acceleration or aggressive shifting‚ as these can put extra stress on the transaxle components. Periodically inspect the transaxle for any signs of damage‚ such as leaks‚ cracks‚ or unusual wear. When driving in extreme conditions—like consistently towing heavy loads or frequently driving off-road—consider more frequent oil changes to account for the added stress. By following these guidelines‚ you can significantly extend the lifespan of your manual transaxle and ensure smooth‚ reliable operation for years to come.